Inventor management with PM Invent is simple, straightforward and intuitive. Below are the basic steps to configure logins and/or create new inventor contact records.
Note: When inventors login using PM Invent, they only have access to a simple page with disclosures for which they are listed as an inventor.
- Go to the Invent module.
- Click the Request Disclosures button.
- Select from Existing inventors. Note that existing inventors can be enabled if 1) they have an email address; and 2) they have a value in the Assignee dropdown menu in their contacts record. Logins cannot be enabled without these fields populated. If you know an inventor exists in your contacts database but does not show up in the Existing list, you can open the contact record and add an email and/or Assignee. Refreshing the page and returning to the Request Disclosures From Inventors pop-up window will now show the inventor.
- New inventors can be created from this window without having to first create a contact record in the Contacts module. Under Add new inventors, select a Client.
- Enter a New Email address in the field.
- Click the Add button.
- Notice that adding an inventor by either selecting the inventors or adding a new inventor adds them to the Send Requests box to show which inventor(s) is selected.
- Click the Send Requests button.

Clicking the Send Requests button automatically sends an invitation email to each contact's email address. Click here for specifics on editing this email.
- Once the sending process is complete, a Green Checkbox appears next to each inventor if the email was successfully sent. Any inventors having a red X usually means a login already exists for this email address. Contact support@appcoll.com for further assistance.
- Click the Close button.

Each invitation email includes a one-time link to create a login. Once the link is clicked the inventor is asked to accept the standard AppColl EULA agreement followed by a profile screen where they must fill out their contact information as shown below.
Please Note: The link shown in the inventor email is a one-time code. If the inventor clicks the "Cancel" button before saving the profile details, the code no longer works. In this instance, a new one-time link can be sent in another email by opening the inventor's contact record and clicking the "Resend Login Email" button.

Once the inventor's profile is saved, they will be taken straight to a blank invention disclosure form screen. For information on filling out invention disclosure forms, click here. Once they fill out the invention disclosure and submit, they will see their submitted form and the ability to add additional disclosures from the Add Disclosure button.

Disabling Logins - Inventor logins, as with any other login types, can be disabled from the Contacts Module by checking the box next to one or more contact records and clicking “Disable Login.”
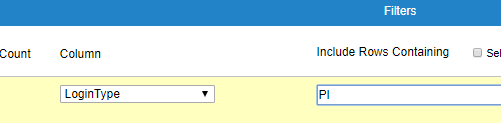
Viewing PM Invent Logins - You can easily see who has existing PM Invent logins from the Contacts Module by filtering on LoginType contains "PI".